Week Two
- May 23, 2018
- 3 min read
Asset Creation & UV Maps
My main focus for week two was constructing all of the low poly assets and getting them unwrapped. Some assets will be created using a high to low workflow that I will move onto in later weeks.

Main Assets
For the low poly assets, I used a single scene to create most of them. this was so I could have the block out reference loaded and compare all the assets to it keeping in scale. Making adjustments where necessary.
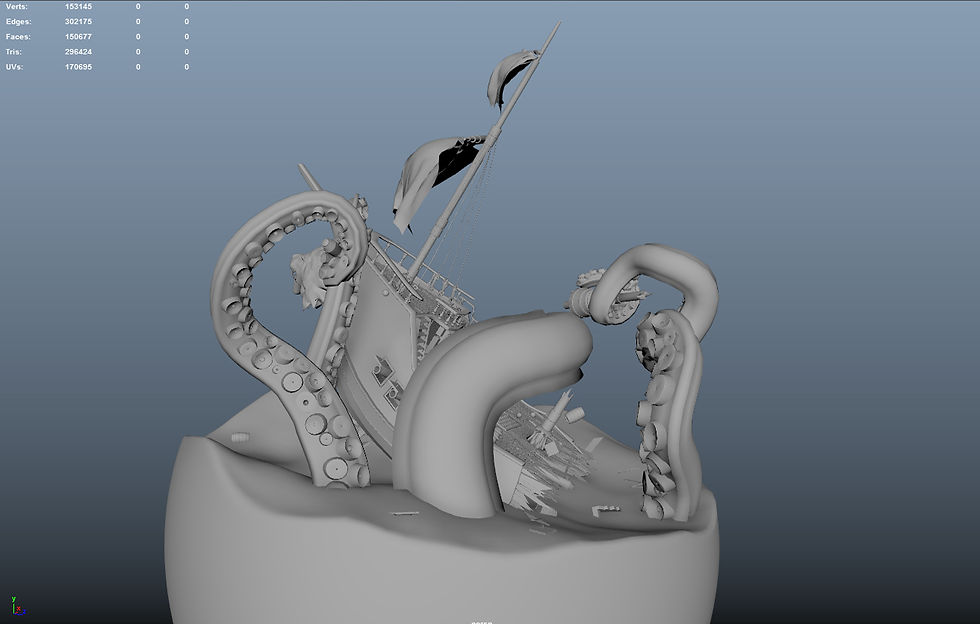
Ship Hull
When creating the hull, I sorted through several blueprints (www.theblueprints.com) trying to find one that fit best with my overall idea. I wasn’t to worried about keeping it faithful to the blueprint as I knew I would be free styling the design based more accurately off of my block out, but I knew this would help with the basic shape. finding good blueprints from the 1700’s was surprisingly challenging.
I started by placing the blueprints onto image planes in the front and side views, created a standard plane with no subdivisions and stared an edge by edge extrusion process, matching up the edges and verts to the blueprint shape, only focusing on modelling one side. Once the basic shape was formed I focused more on my references in the art bible to make a more unique hull, performing some adjustments to the edge flow and topology. I created windows using a Boolean difference with a cube then fixing up the typology with the modelling toolkit making new cuts and welding verts. The final part of designing the hull was mirroring it over to create two sides, I made sure to keep a gap in the middle so I could fit in a figure head piece for the ship.

Floor boards
For the floor boards I created a set of four normal planks and a set of four broken planks to be used as modular asset. The low Polly’s were created by scaling and moving the vertexes to resemble more broken forms. (floor board picture)

Banister column (curve)
To create the banisters columns, I created an EP curve added points free hand in the side view using my art bible as reference for the general shapes I wanted to be incorporating, then using the vertex controls to further refine my shape. From here I used a simple revolve trying not to make the poly count to overwhelming by editing the options in the revolve settings.

Rope (curve)
For the rope I took to two different process. The first as just a basic torus scaled in the Y axis for when they were all bunched together, where I can later add detail through texturing. the second using a curve to actually create a physical rope making it wrap around where I wanted it to. I did this by selecting a cylindrical edge then selecting the curve (geometry first) and extruding with a set amount of subdivisions, in a similar fashion to how i made the tentacles. Later deleting unnecessary edges.
Sail. (Ncloth)
To create the sail I used wind simulations, I took to the process of converting a plane into an Ncloth, and constraining its verts to the mast I had set in place in order to stop it from falling. From here it was a matter of adjusting the parameters of the nucleus to get an agreeable wind simulation. This proved to be not enough on its own so took to creating a collider object out of a sphere and set it up some key frames so it would hit with the sail in order to create a more realistic wind-swept look, once I was happy with the wind effect I duplicated the plane at two points in its animation/simulation cycle to be used as two different sails. One high and one low.

UV unwrapping
When creating the uvs i started out by freezing all transformation and deleting the history, to make sure that the unwrapping results were accurate. then setting the texile density to 6.8. for the most part I tried to maintain that all the objects had as few seems as possible, and as few uv islands.
My process for unwrapping mainly consists of using the camera base uv creator and then using the 3d viewport to cut the edges where I need. I do this as it allows me more control and the ability to work faster than using the automated functions for more complicated shapes.

For simple objects like the mast I used the cylindrical unwrap function and the planar mapping for its caps.


Comments